Link & Grow - Grow & Thrive
CREATE a Succesful Campaign with Selected Contacts and automatic Follow-Up Emails with GMass 📧
Category: Cold emailing,Link & Grow Author: dreadpixel Date: 3 years ago Comments: 0

In this tutorial, I will show you a workaround on how to deploy cold emailing campaigns with automatic follow-ups and this is thanks to GMass

First you need to complete the cycle of getting precise data using Leads tab of Link & Grow Desktop version.

1.- Then you need to verify all those emails before extracting more data to decide who to contact. Remember is not about quantity but quality. We will be using GSuite, so they have limits per day, and consider all the follow-up emails that will stack along the campaign of sending. So you better research your data if you don’t want to be marked as SP@M.

2.- After you verified and Extracted Data with Custom XPaths for the Network of choice. You can see more guides on how to configure Enrich Data from the Leads tab here:

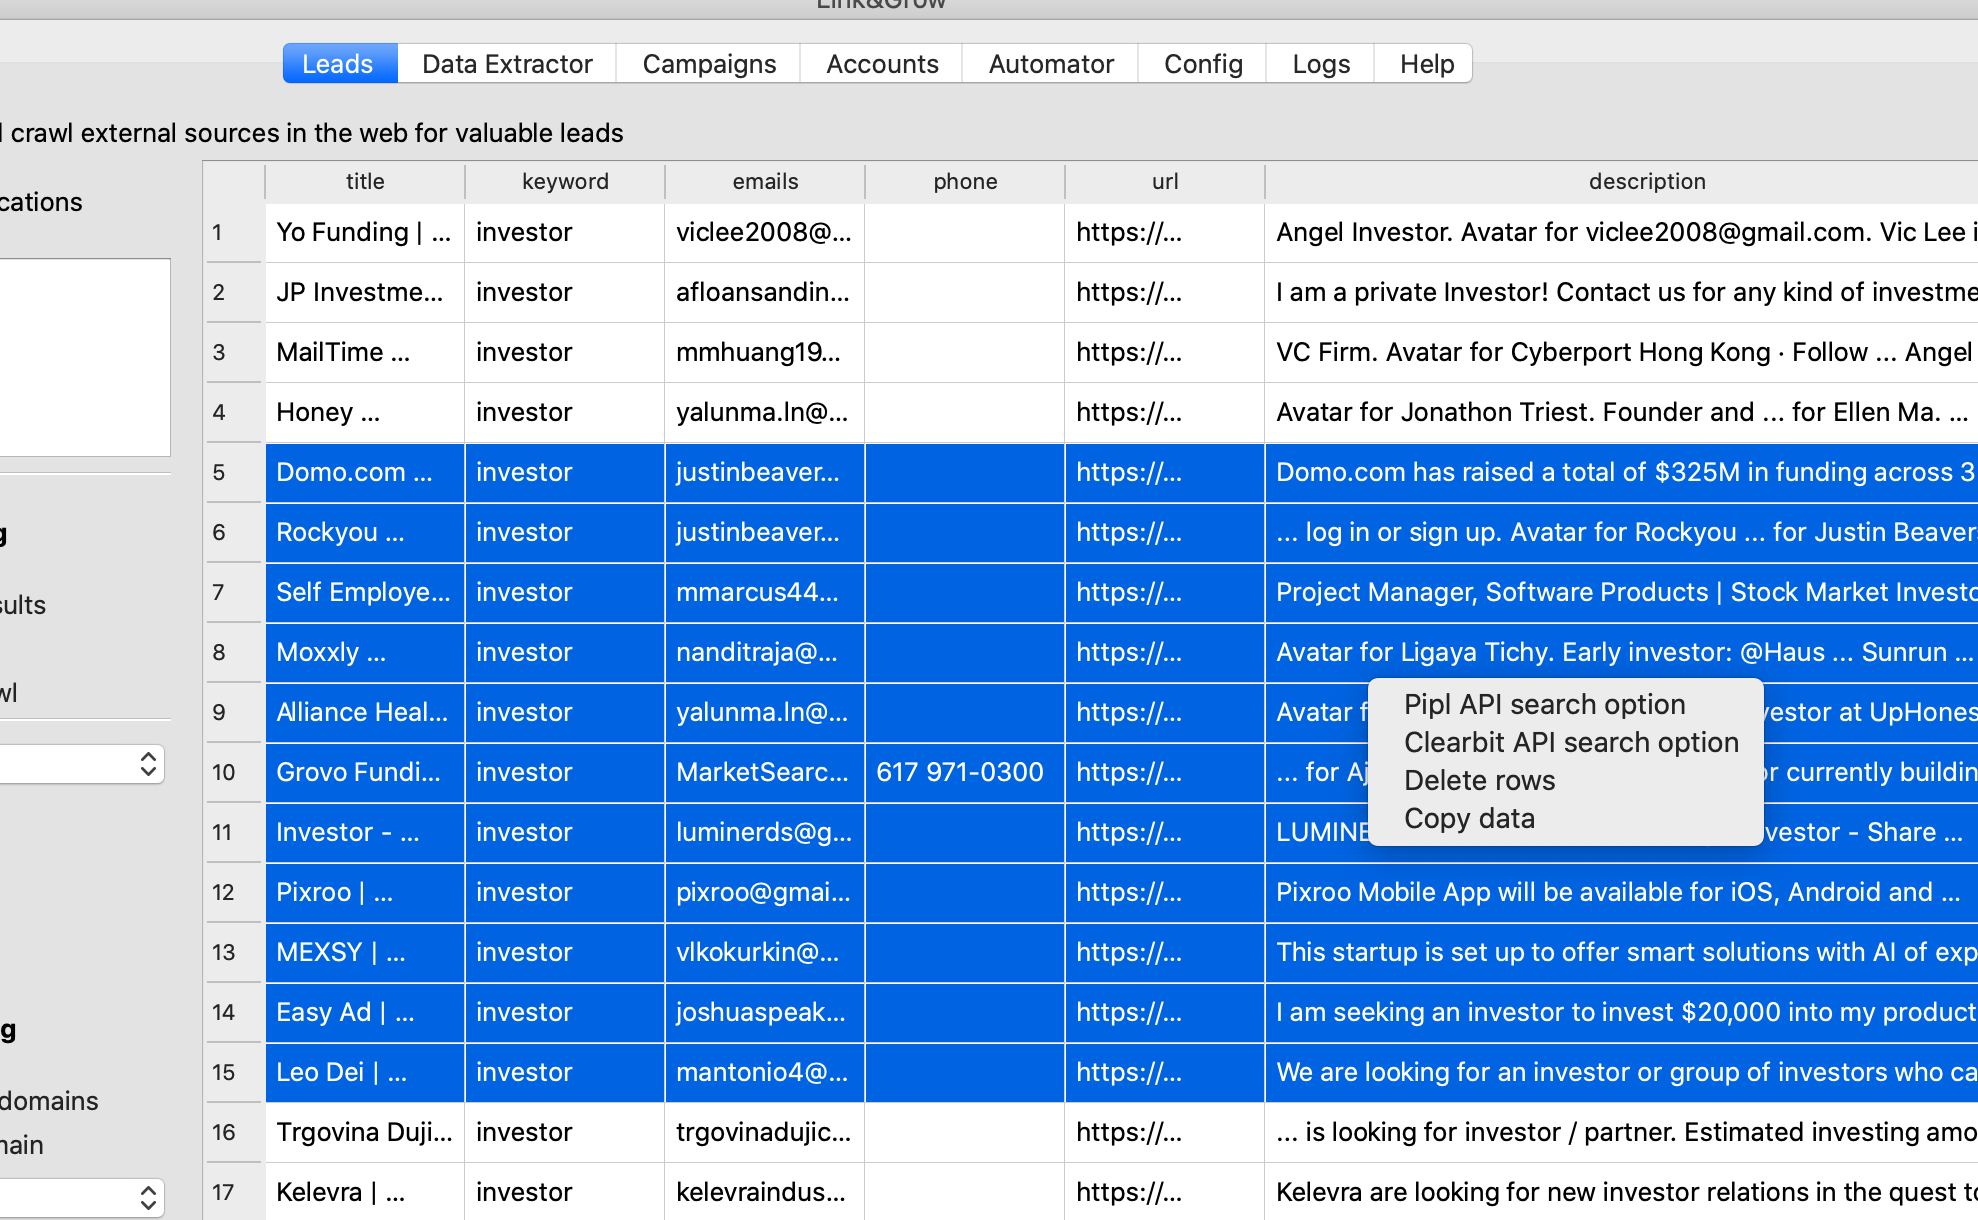
3.- Once you get all data enriched like number of followers, or specific information on your requirements, either a Profile(B2C) or a Company (B2B). Then you need to pass all data into a Data Sheet in Google Sheets. Is really easy, here we will update with a video of just copying data within Link & Grow Desktop version using right click on selected data on the table and the copying to clipboard.

There when right clicking just click Copy Data

Then you have to go to your Google Spreadsheet and just paste it there.

4.- Now you have to go to GMass and install their Chrome extension.

5.- Then just learn how to use Google Spreadsheet within GMass to auto sending and updating. Here is a pretty good guide from their blog: https://www.gmass.co/blog/google-sheets-mail-merge/

6.- Finally just make sure you configure the Auto follow-up campaigns that are on the $19 USD per month per account. That will do, just remember and we repeat. Is not about quantity but about quality.


How to activate SMTP sending on GSuite and use it with Link&Grow
Category: Google,Link & Grow,Tutorial Author: dreadpixel Date: 3 years ago Comments: 0

Activate SMTP sending on your GSuite account can be a pain, but here we gathered a simple 3 Steps guide to activate them right now.

Sign into your Google Account and go to: https://myaccount.google.com/

1.- Go to Security.

Go to your settings, and then to Security.

2.- Scroll down and click on “Turn on access” in the “Less secure app access” panel:

Then go to Less secure app access and click on Turn on access.

3. Finally just click the Toggle so it is blue.

This tutorial is on the Free eBook at: https://ebook.growthrive.net


How to get Profile Leads from any network such as Facebook, Twitter & Instagram
Category: Instagram,Link & Grow,LinkedIn Author: dreadpixel Date: 3 years ago Comments: 0

We will explain you how to use Link & Grow Desktop software in order to get Profiles URLs that contain important contact information in order to communicate with them via multiple strategies. Most importantly, adding them as contacts, cold email them or create custom audiences to narrow your audience in your PPC Campaigns.

Here is a video explaining step by step:

Technically you need to know which networks are the best to get profiles from people. Also in which networks you can mass import contacts from emails, and finally modify for custom commands and getting more important data.


Big Changes on the Link & Grow project
Category: Link & Grow Author: dreadpixel Date: 4 years ago Comments: 0

We are happy to let you all know we have reached our goal for selling 150+ Lifetime licenses. So we closed the deal and open only into a membership style.
From now on members will pay a monthly fee so we can maintain the methods and new services we will provide in the new web version.

You will find many amazing things in the web version, but first lets present the latest changelogs since we didnt update this in a while. It is now private since it includes many methods and guides only members have access to.

Latest updates:

————————————————————-
– August 25 2020 — 0.9.4 Bugs, Data Extractor and more
————————————————————-
1.- Fixed bugs for deleting leads, added Pipl API again.
2.- Fixed the Old Fashioned Crawl bug when storing leads in database.
3.- Custom Patterns are fixed and working.
4.- Added Web Version / SaaS, so enter the portal https://growthrive.net/linkgrow/app for all.
5.- Added HTMLBuilder and several templates for Email and Landings on the SaaS version.
6.- Added direct proxy management on Data Extractor, this is a game changer.
7.- Fixed bugs when selecting and deleting data directly on the data table.
8.- Added selection for Phones only, Emails only or just URLs for later processing.
9.- We added our own Email Verification service which is FREE withing your membership and will be improving eventually.
10.-

————————————————————-
– July 12 2020 — 0.9.3 Optimized User Experience and new features
————————————————————-
1.- You won’t have to setup ScraperAPI, everything comes within the system.
2.- Don’t worry about configuring patterns, there is now a manual and default mode.
3.- Added patterns for Looking only for Emails, Phones , both or just URLs.
4.- Changed chat into Help tab.
5.- Links for documentation and guides in help Tab.
6.- accounts will be handled on each tab section, so we removed the Accounts tab.
7.- Config tab is by default minimized.
8.- Included Profiles on Email Campaigns section.
9.- Height maximize is now working.
10.- Delete Leads form Leads tab directly, just select those that you want to delete right-click and click Delete.
11.- You can copy also directly on leads tab, just select all to copy, right-click, copy, and paste in Excel.


1 2 3 4 5